Docker Part 1: What is Docker, How Does it Work, and Where is it Used?
In this blog, we’ll take an in-depth look at Docker, often referred to as the “technology of the future,” but more accurately, the “infrastructure technology of the future.” Since we’ll be using Docker for most of the demos in upcoming blog posts, it’s crucial that readers have a solid understanding of Docker. That’s the purpose of starting this blog series. While I don’t claim to provide unique information about Docker, the goal here is to offer a concise, practical guide with a pragmatic approach to Docker.
This Docker blog series includes three main parts:
Summary of Steps
By following these steps, you’ll get a general understanding of Docker, how it works, and the problems it aims to solve.
- We’ll start with the origin story of Docker.
- Provide details about Docker’s architecture and installation resources.
- Review Docker terminology.
- Get introduced to Docker CLI (Command-Line Interface).
- Discuss Docker’s use cases and the problems it aims to solve.
- Finally, we’ll create a Docker CLI Cheat Sheet for future reference.
Motivation
Before continuing with this blog, I highly recommend watching the following videos (especially the first one) and reading the article linked below:
- First video (5:21): Watch Solomon Hykes, Docker’s creator, demo Docker for the first time on March 21, 2013.
- Second video (20:47): Solomon explains why they developed Docker.
- Read The Docker Civilization, written by Muhammed C. Tahiroğlu.
Prerequisites
To follow along, you should:
- Be familiar with the command line on your platform (Windows, Linux, Mac).
- Have general knowledge of hypervisor-based virtualization (optional).
- Use Docker version 1.12 or above for the examples in this blog.
Important Note
If you’re using Docker Toolbox or docker-machine instead of Docker for Windows or Docker for Mac, replace localhost with your docker-machine IP (likely 192.168.99.100) in the examples.
The Origin Story
History
Docker is the world’s most popular software containerization platform. Containerization involves packaging applications into containers. Docker is based on Linux Containers (LXC), a technology introduced in 2008 with the Linux Kernel. LXC allows for isolated processes to run in separate containers within the same OS. This provides OS-level virtualization, where processes within containers run as if they are the only ones in the system, even though they share the same kernel. Despite being isolated, containers can’t communicate with each other unless explicitly allowed, enhancing security.
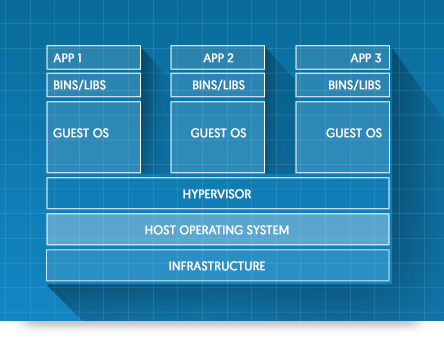
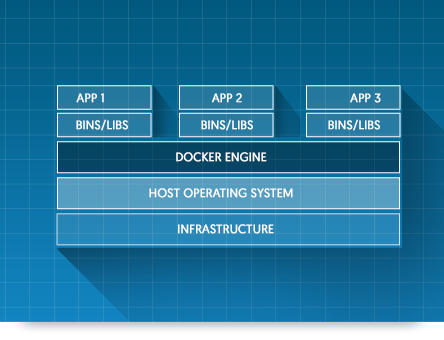
Virtualization platforms like VMware, Xen, and Hyper-V allow multiple operating systems to run on the same physical or virtual server. Data centers today rely heavily on these hypervisors to manage infrastructure. In contrast, LXC allows multiple isolated applications to run on a single OS without the need for a separate OS instance for each. The structure of virtual machines and Docker containers looks like this:
-
Virtual Machine Architecture

-
Docker Container Architecture

Compared to hypervisors, LXC reduces disk space usage because containers share the host OS. For example, while hypervisors require 7GB of disk space per virtual machine, containers only require a single 7GB space for all of them. This saves significant resources and simplifies system maintenance since you only need to manage one OS instead of several.
Transition from LXC to Docker
While Docker started with LXC, it has greatly simplified and standardized container creation, making it accessible to the masses. Docker introduced the concept of Image files, which define the structure and configuration of containers in a text-based format (we’ll cover this in detail later). Images are organized in layers, allowing efficient updates by only modifying the changed layers.
Another important distinction Docker made is that it encourages running only a single process per container. This keeps containers lightweight, easily scalable, and highly modular, which supports the growing trend of microservices.
Additionally, Docker moved away from LXC dependency by developing its own libcontainer, giving Docker more control and independence from the Linux Kernel, which was essential for faster development and greater flexibility.
Installation and Architecture
Installation
Docker’s installation instructions are well-documented and platform-specific. Here are the links for each platform:
Architecture
Docker consists of two main components:
- Docker Daemon: Communicates directly with the Linux Kernel and runs the containers.
- Docker CLI: A command-line interface that allows users to interact with the Docker Daemon.
On Linux, both the Docker Daemon and CLI run natively. On Windows and Mac OS X, the CLI runs on the respective OS, while the Docker Daemon runs within a Linux virtual machine using a hypervisor (such as VirtualBox or Hyper-V). This setup allows Docker to run on non-Linux platforms.
Here’s how Docker architecture looks on Windows and Mac OS X:
- Docker on Windows/Mac OS X
Terminology
Here are some key Docker terms you’ll come across:
Container
A container is an isolated process running in its own environment. It’s similar to a virtual machine but lighter since it doesn’t require its own OS.
Image & Dockerfile
An image is a blueprint for a container. It includes the filesystem, configurations, and applications. The image’s structure is defined in a Dockerfile, which describes how the image is built.
Summary of Docker Fundamentals
-
Docker Commands Overview
- When executing
docker run hello-world, the Docker Daemon creates a new container if the image isn’t previously pulled. The command results in a brief output indicating successful execution. - The
hello-worldimage serves a single purpose: to display a greeting message, demonstrating Docker’s essence. Each image is designed to perform a specific task.
- When executing
-
Checking Running Containers
- Use
docker psto list running containers. If everything is correct, only headers will appear, ashello-worldcompletes its task and exits. - Use
docker ps -ato see all containers, including exited ones. Example output shows an exited container with its ID.
- Use
-
Inspecting Container Details
- More details about a specific container can be accessed using
docker inspect <container_id>, although this may divert from a pragmatic approach.
- More details about a specific container can be accessed using
-
Restarting Exited Containers
- Restart an exited container with
docker start -a <container_id>to attach to the terminal. Omitting-ashows only the container ID without output. - Detached containers can have their logs viewed using
docker logs <container_id>.
- Restart an exited container with
-
Removing Containers
- Containers can be removed with
docker rm <container_id>. Usedocker rm -f <container_id>to force removal, even if running. Verify removal withdocker ps -a.
- Containers can be removed with
-
Working with Nginx Image
- Start an Nginx container using
docker run -p 8080:80 nginx:1.10, demonstrating port forwarding. Access the Nginx welcome page athttp://localhost:8080. - Port forwarding syntax:
-p <host_port>:<container_port>.
- Start an Nginx container using
-
Container Configuration
- The Nginx image listens on port 80 by default, serving a test page. This is a pre-configured behavior of the official image.
-
Accessing the Container’s Shell
- Use
docker exec -it <container_id> /bin/bashto access a running container’s shell and run commands inside it.
- Use
-
Detached Mode
- Running containers in detached mode (
-d) allows terminal access without blocking. Container IDs can be managed withdocker psand terminated usingdocker kill <container_id>.
- Running containers in detached mode (
Docker’s Applications and Problem-Solving Potential
- Docker addresses the “works on my machine” problem, ensuring consistent environments across development, testing, and production.
- Standardizes development environments, mitigating discrepancies between local and deployment environments.
Implementing Tenancy Logic Beyond Application Level in Multitenant Systems
Thanks to Docker’s low-cost and flexible virtualization, the necessity of implementing multitenancy logic within application code diminishes. Multitenancy refers to a software architecture where a single application serves different clients, giving the impression that each operates on a separate instance. For example, a conference management application can handle conferences for various clients from a single instance, eliminating the need for separate servers for each client and lowering maintenance costs. However, it is essential to incorporate logic that separates tenants at the application level, which can lead to errors. A novice developer may code a screen without considering multitenancy, inadvertently allowing all tenants access to each other’s information.
With Docker, tenancy logic can be decoupled from the application code. The application can be designed as if there were only a single tenant, simplifying the overall structure. For each tenant, a new container can be created from the relevant image and associated accordingly. This approach shifts tenant management from a complex application level to a more manageable platform level, resulting in a more manageable infrastructure.
Docker CLI - Cheat Sheet
| Command | Description |
|---|---|
docker images |
Lists images available in the local registry. |
docker ps |
Lists currently running containers. |
docker ps -a |
Lists all containers on the Docker Daemon. |
docker ps -aq |
Lists IDs of all containers on the Docker Daemon. |
docker pull <repository_name>/<image_name>:<image_tag> |
Downloads the specified image to the local registry. Example: docker pull gsengun/jmeter3.0:1.7. |
docker top <container_id> |
Executes the top command within the specified container and displays the output. |
docker run -it <image_id image_name> CMD |
Creates a container from the given image by attaching the terminal. |
docker pause <container_id> |
Pauses the specified container. |
docker unpause <container_id> |
Resumes a container that was paused. |
docker stop <container_id> |
Stops the specified container. |
docker start <container_id> |
Starts a stopped container. |
docker rm <container_id> |
Removes the specified container without affecting related volumes. |
docker rm -v <container_id> |
Removes the specified container along with its related volumes. |
docker rm -f <container_id> |
Forcefully removes the specified container. Can only remove running containers with -f. |
docker rmi <image_id image_name> |
Deletes the specified image. |
docker rmi -f <image_id image_name> |
Forcefully removes the specified image; images tagged with different names can be removed with -f. |
docker info |
Provides summary information about the Docker Daemon. |
docker inspect <container_id> |
Displays detailed information about the specified container. |
docker inspect <image_id image_name> |
Displays detailed information about the specified image. |
docker rm $(docker ps -aq) |
Removes all containers. |
docker stop $(docker ps -aq) |
Stops all running containers. |
docker rmi $(docker images -aq) |
Removes all images. |
docker images -q -f dangling=true |
Lists dangling images (untagged and not associated with any container). |
docker rmi $(docker images -q -f dangling=true) |
Removes dangling images. |
docker volume ls -f dangling=true |
Lists dangling volumes. |
docker volume rm $(docker volume ls -f dangling=true -q) |
Removes dangling volumes. |
docker logs <container_id> |
Displays the accumulated output in the terminal of the specified container. |
docker logs -f <container_id> |
Shows the accumulated output in the terminal of the specified container and continues to display logs as they are generated with the -f flag. |
docker exec <container_id> <command> |
Executes a command within a running container. |
docker exec -it <container_id> /bin/bash |
Opens a terminal within a running container, assuming /bin/bash exists in the relevant image. |
docker attach <container_id> |
Attaches to a container that was started in detached mode with -d. |
